Friday, September 27, 2013

Minky Elephant Finish

Another busy week here, but I did manage to add a final finish to my Minky Elephant Baby Quilt.
This quilt was my first time with improve curves, as well as quilting on minky & I posted a bit about this quilt back in April. It just seemed a bit boring to me, so this week I appliqued the elephant with some velour from my stash.
I am likin' it much better! I did not use a batting, and the fleece gives it a great drape. I think this was the first time I did the machine binding.
AND,
Lucky me, I received a giveaway surprise package from Julie at 627handworks !!
YUM!!
I wish I had photographed it before I ripped it all open - Such a cute wrapping, and Julie stitches Pez fabric on her business card. Quite creative, and too cute! The fabric FQ bundle is from Caitlin, who runs 'I don't do dishes' , a great shop on Etsy. She has beautiful fabrics at reasonable prices.

And I am loving the Aurifil sampler pack. Has anyone ever used the wool thread? It is the red one. I might have to try a wool project just so I can use it:-)

Yep, lucky me:-)

Linking up this week with Julie at Thursday Threads, Cherry Valley Designs for TGIFF, and Sarah for Can I get a Whoop Whoop?  Sarah made the cutest Dresden plate Apron - check it out!

Monday, September 23, 2013

Monday BOM's Away!

I have two blocks to share with Lyn's linkup at What a Hoot!
First up is Hello Moon Space Bugger:
August Hello Moon Block
And next up; I finished a Round3 border for the Add-a-Border Block Swap Group I participate with. It took me several months to tackle this,

It was by far the hardest challenge I have had with this group. It hung on my design wall forever while I contemplated it- thankfully there is no expectation time-wise with this group! The block was named Resolve by the first quilter, who made the original 6" block (with the pink heart). She and the second quilter both stated they had used new-to-them techniques. This style itself is new-to-me, so I just kinda went for it...
Then I moved right on to the next block I have from this group:
I pulled some fabrics, but I do not yet know what border I will add.
I love that I have lots of options for this one!

Fabric Stash Share 9.23

Linking up with Alyssa at Pile O' Fabric this morning for Stash Share:-)

Bold Stripe: 2007 Brother Sister Design, Rosette by Julia Horner, Hexies by Timeless Treasures, Nicoise by Alexander Henry, Black Dot by MBT, & Malibu Monkies by Erin Michael for Moda

Friday, September 20, 2013

Charity Quilt Finish - An Elephant March

 
This cute little baby quilt made it's way yesterday to Debbie, our local Chapter Coordinator for Project Linus. It was a pleasure meeting her, and I was surprised she was not yet aware of the quilt drive, 100 Quilts for Kids, hosted by Katie over at Swim, Bike, Quilt. Hopefully she will spread the word to quilter's who have already donated quilts and may not be aware of the fabulous giveaways they may be eligible for, just by linking their quilts for entry by the end of the month.

I was a bit humbled when I took a look at all the gorgeous quilts posted at the 100 Quilts for Kids Flickr Group! There are so many outstanding quilts posted by some very generous quilters!

This was a pretty quick quilt, and I am pleased with the finish. This was the second time I machine stitched the binding, and it went pretty well! I used 2.5" strip and stitched at 3/8" to the backside. When I flipped and the front down it was smooth sailing. Very little stitching was visible on the back when I finished, I pictured the worst of it in the 2nd photo here:

I still really prefer a hand finished binding, but as I get better with this technique, I can see great use for it, especially for baby quilts.
The backing is plain by today's standards, but I made a unique label that can be left as is, or someone may choose to write a name or message on it.
I had some problem with thread breakage when blanket stitching this down, switched to a 65 needle and muscled on, trying not to let the perfectionist in me talk negatively, and hoped no one would really notice. Then I signed it with a red Staedtler permanent ink pen and heat set it. I have used this pen once before, on a Christmas quilt, but for some reason it did get just a bit blurry when I washed and dried the finished quilt. Maybe if I had used a hotter iron, or longer press, it may have taken better, but I no longer recommend this pen(!).
Linking up with other Friday finishes with Sarah at Confessions of a Fabric Addict for Can I Get a Whoop Whoop? , and with Missy Mac Creations for TGIFF!

Monday, September 16, 2013

BOM's Away - Stashbuster QAL

Just a quick note of progress on the blocks I began last week when I found the Stash Buster's QAL at Linda's Quiltmania. It is a relaxed QAL - we are not required to make blocks each week and we can use the blocks in whatever manner we are inspired ..
Blocks from week one:

Blocks from week two:
I am in love with these, but have not yet figured out the setting... 

Baby quilts are my favorite! I am actually working today on a third baby quilt as well, from blocks inspired by week one. I should be able to reveal the finished quilt this week!

I just noticed the Hello Moon August Block is available from April Mae Designs How did that slip by me?!!

Vow to self, " I AM CUT OFF - NO MORE NEW FO'S IN 2013!"

Linking up with Lyn and BOM's Away!

Maybe it wasn't my FIRST time, but it wasn't long thereafter....

I was blessed with this precious bundle!

New mom of two weeks. Likely this was taken with a 110 pocket camera..
Melissa at My Fabric Relish is looking for stories and pictures of our first time experiences, and I understand the topic is QUILTS,
not BABIES...
but if I had not had this baby boy, I am not sure the quilting bug would have bit at all!

Is it obvious that I did not know if I was expecting a boy or girl?
I quit working about 6 or 7 months into pregnancy and, with very little experience, I began sewing like mad - sleepers and things for the baby. My first quilt was a result of all the leftover fabrics.

This beauty is technically not a quilt, since it did not occur to me at the time to tie or quilt it. I just whipped up all the little squares, no matter what the fabric content (mostly poly flannels(!), some stretch fabs(!), and even pre-quilted fabric I had used for a bunting. Nevertheless, this quilt survived brutal abuse and hundreds of washings over the years, and it led to my passion for quilting!

From there, I next made a Carpenter's Square wall hanging, inspired from a library book.
Looking back, I don't think it was actually a quilting book since I apparently did not learn any quilting 'rules'.  The back fabric is folded over to the front and stitched to make the binding. I still actually love this little beauty and it is hung proudly - in my walk-in closet - for my own viewing pleasure only. Well, until now that is...
I hand quilted the motifs with no regard for thread, knots, or the back of the quilt at all...
And what of that little boy wonder? He got the itch as well, about 11 yrs later, and the project fit right into mom's easy-going homeschool curriculum.

What a fun link up! Reading through the stories of other 'Firsts' as well as the beautiful photos shared with them, made me a bit reluctant to share my own. But this is my story, and I will share it proudly!

Update: Looks like I missed the boat again - the linky part is closed! Does this type of thing happen to you all the time too?

Stash Share with Alyssa

A very quick pic this morning; fabric selected from my stash in the color palette of the week selected by Alyssa of Pile O' Fabric for her weekly Stash Share :-)
Utopia by FreeSpirit, Denyse Schmidt (DS Quilts for Fabric Traditions), Timeless Treasures from the Lotus collection, and Bohemian Soul, a Top Drawer Fabric from Hancock's (!)

Tuesday, September 10, 2013

Two new Barn Quilt Blocks, and a New QAL!

I am so excited about the barn blocks my husband and I have been working on! I finished painting two of the Churn Dash blocks, and will soon be adding a 'Barn Blocks' section on my Etsy shop as part of it's makeover. These are two of my faves so far:
24" Barn Block made of Rebar and Sheet Metal
 
I snapped a photo & added Ty as a shop member today....
Ty enjoys working in his slippers, as do I :-)
He is into modern furniture & metal wall art - http://tekilounge.blogspot.com/
The blog is new, so he would LOVE a comment if you make it over there!

Of course, I am still stitching as well! Yesterday I stumbled upon some purty blocks made with the new Stashbuster's QAL at Linda's Quiltmania. Never one to avoid a new distraction, I jumped right on the bandwagon and whipped up the first two blocks. Her tutorials were easy to follow, and I love the modern designs.
Block from Week One, (I made them a bit bigger @ 16")
These are not joined cuz I decided to add a few more & complete a baby quilt.
 
Block from Week Two; I am going to make three more - blue, yellow, and green - for a baby quilt.

Check out Linda's Flickr group to see what other quilter's are coming up with! If you follow my blog, you know that I often enjoy mixing vintage with modern, and this group seems to have a mixture that I will feel comfortable posting with in either style:-)

Linking up with Lyn at BOM's Away,

As well as Lee for WIP Wednesday!


Monday, September 9, 2013

Stash Share wtih Pile O'Fabric

I am linking up with Alyssa over at Pile O' Fabric for Stash Share again this week!

Love the colors she has selected this week, and it did not take long to pull some favorite fabrics:

1. Robert Kaufman, Pimatex Basics 2. Donna Wilder, Windchime for Stonehill Collection 3. Cosmo Cricket, Salt Air for Moda 4. Sandi Henderson, Henna Garden for Farmer's market 5. Tula Pink, Neptune for Moda 6. Quilt-Gate Mary Rose Collection

Join the party, Alyssa is encouraging participation this week with a giveaway!

Friday, September 6, 2013

Finally, a Finish on a Friday, and a Tute to boot!

Finished up these sweet pillows with some FMQ this morning!
Carpenters Wheel Blocks, 14" Pillows
Too bad I only have one pillow form for the photo!
It has been hot and abnormally humid this month, so I have been reaching toward smaller projects, plus they give me some valuable Free Motion Quilting  practice. I was inspired to try this little diamond-line design after reading a review by ChristaQuilts of a Craftsy class she had taken with Angela Walters (Dot to Dot Quilting).
backside, oops I missed a few lines there.... hmmm
Now that I've given it a shot, I think I will use a similar pattern for the X's on my Purple Kisses Quilt, a QAL quilt I made with Christa several months ago.
I finished all the O's and have changed my mind several times for the centers and x's
I made up some kits for these pillow blocks, to sell at the upcoming Sew Street Market, a parking lot sale scheduled Oct 12th at Quiltique, in Henderson, NV. I collated these vintage fabrics from a quilt kit so that each kit makes two blocks, which I chose to use for pillows. I really love the pattern, and may cut some more, from Christmas fabrics, to list on Etsy as well. For now, my little kits are package up and ready to go to market:-)


Linking up today with Crazy Mom Quilts , Can I get a Whoop Whoop?,  & TGIFF

Because I am heading to First Friday, our monthly Artwalk/party in Vegas, I won't be able to surf the parties until tomorrow!

Scrappy Carpenter's Wheel Quilt Block Tutorial


This recipe makes TWO 12.5" blocks!

Preparation:
Read through instructions prior to beginning.

Cut TWO each of 32 different scrap fabrics;  2 3/8" square.
Cut 64 x 2 3/8" squares background fabric
Cut 32 x 2" squares background fabric


1. Pencil line diagonally across the wrong side of the background (32 X 2 3/8") squares.

2. Select eight prints you would like for the center star. Pair one of each of these up with a background square, right sides together, and with the pencil line on top. Chain stitch 1/4" from diagonal line, and again down the other side of the line. Stitch as accurately as possible to avoid trimming squares later!
3. Cut across the center line, and finger press (or iron) the seams in your preferred manner. (Open, or toward the side of the darker fabric). You will have HST squares - set aside eight of them for the second block.
4. Next, take a look at the top picture, and choose eight colors you like for the points located at the N., S., E., & W. positions. Pair all of the print blocks (16) with background squares, chain stitch all 16 squares with the same technique as step #1, stitching 1/4" from diagonal. Follow step #3 as well, and set aside 16 of these squares for the second pillow block.
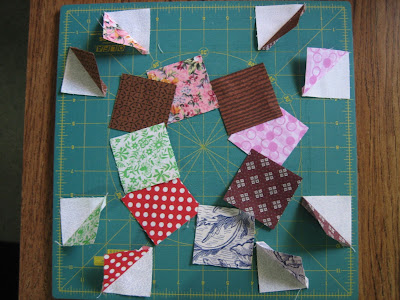
N, S, E, and W points after making HSTs

5. Select eight more print colors, and repeat these steps again, sewing only ONE of each of these prints. Cut them apart to make 16 HSTs and again, set aside the duplicates for that second pillow block..
6. To pair up the colored print squares that are remaining, you may want to now lay out all your center HST's to better visualize your placements. The four center blocks, (as well as the three squares in each corner) are HST squares made of colored prints only, instead of the background fabric. You need to match these up, and then sew them with the same HST method, and again setting aside the duplicates for block two.
Lay out the center section and assemble
Set cent aside, and now layout N,S,E,& W points so you can layout the corner colors


 7. Add the 2" background squares to your design board, and you should now have 62 x  2" squares all ready to assemble!

Now fill in the center, and the 2" background squares
You are ready to assemble the columns, and then the rows!
Assemble the columns, then the rows, pressing seams with your preferred method - either open seams or, as I did, alternating from one direction to the other so you will be able to 'nest' your seams when sewing the rows together.
Next, assemble the second square, add your borders, & quilt the top(s)if desired.     
NOTE: If you plan to quilt the block prior to attaching backing, oversize borders are recommended to account for quilting 'shrinkage'. The blocks may then be trimmed to size prior to attaching backing.       
That's it! Please let me know if you have any questions!


Tuesday, September 3, 2013

A bit of Mondrian Inspired Goings On


Piet Mondrian Inspired Wall hanging, 27" x 24"

A quick wallhanging stitched up for my hubby!

Self-threading needle makes tucking tails a breeze, right at the machine!
First I made these little mugrugs so I could play with threads and patterns. You can probably see where I ripped the stitches from the upper right one, not liking the design I stitched in. I tried several patterns before I settled on the simple wavy lines. I am getting more accustomed to my Juki. It is faster, and the pedal touchier than my old Bernina, and I am still working to improve with consistent speed and stitch lengths.

These coasters were photographed on the Mondrian-inspired coffee table Ty made this month...
Piet Mondrian inspired mugrug coasters, 6" Sq


Ty is busy preparing for Art in the Park, a HUGE Fine Art show coming up in Boulder City, NV.

RU curious what is up with the Coca-Cola Crate?
Poster pic ripped from website
 
He does a lot of unique furnishings, and the little green side table is one of my recent favorites..
 I also love these...
Today he is busy making a resting bench. The seat is gorgeous redwood. Likely, it will be appreciated by at least a few of the 100,000 people expected to attend.
 
What I am most excited about are the quilt/barn blocks he is producing...
I will post a bit more about these soon!
 
Regarding Quilting this week, I am preparing a Carpenter's Wheel block Tutorial.
 
 And, I have to admit my NewFO projects look the same as last month (!)
Pretty even though there's been no recent progress...  Hang tough, but maybe don't hold your breath...
It has been a busy month, and a busier one coming up, but in a great way!  
Amy, of Crafty Shenanigan's would say we are feeling very GREEN around here.
And that is a good thing.
 
Linking up with:
 
 
Lee Molli over at, Freshly Pieced WIP Wednesday

Related Posts Plugin for WordPress, Blogger...