Pages

Sunday, November 29, 2015

Cozy Christmas Quilt Sandwich

This is an accomplishment I can say for certain would not have happened were it not for the monthly goal setting we do at ALYoF! A bit of a scramble over the weekend, but I managed to meet my goal!
Cozy Christmas has a backing, and basting is completed!
All credit goes to Melissa, of Sew BitterSweet Designs, and Shanna, from Fiber of All Sorts for hosting A Lovely Year of Finishes! I set my GOAL and linked my post up (#40) early this month. I have three threads selected for the quilting, however the sandwich is all rolled up. There are a few projects ahead of this one, hopefully I will get to it soon - like before Christmas!
Thank you Melissa and Shanna for keeping us motivated!

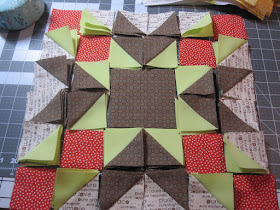
Also in the works this week, I am piecing my Christmas Topper for the QAL led by Carole of From My Carolina Home. Initially this was going to be a Mystery QAL, however Carole's followers voted for a reveal. Of course, once I saw what we were to make I began playing with layout options! This first one is according to pattern layout:

Block Option ONE


Block Option TWO


Block Option THREE
I decided not to share with you my final decision! I do hope you won't lose any sleep over this, but it will remain a mystery until I reveal my topper!

I'll be sharing the suspense with Lyn at What a Hoot, for BOM's Away, and with Jen at Quilter in the Closet for Building Blocks Tuesday!

Friday, November 27, 2015

All -American Lunch Bag!

All in good humor, I was inspired to make a lunch bag when I came across some McDonald's fabric hanging out in my stash! This result was not really my intent when I bookmarked the Lunch Box Tutorial at Pink Penguin ages ago, but a fun Christmas gift for sure!
The pattern is modified a bit - I quilted some denim to make a sturdy base.
Then, I couldn't resist doubling-up the handles to make the golden arches!
I love the drawstring coverlet!
The Bag It Challenge runs until December 14th - plenty of time to hop aboard, make some bags and enter for a chance at prizes! I am inspired by Patty to make a Jewelry Roll, and next week she will post a tutorial for Triangle Bags that sound pretty tempting too.

Check out more Bag-It makes at the Link-up!

Elm Street Quilts

I am linking this up with Ho! Ho! Ho!, hosted this month at Rose & Dahlia!
  The linkup is open through November 30th.
Celtic Thistle Stitches

Friday, November 20, 2015

A FUN Pincushion Finish & Pattern Review!

Super-cute finish to share this week!
Large and sturdy, this fun pincushion is fully-lined and stuffed with walnut shells to keep pins and needles sharp! I combined vintage with retro fabrics to use with a white Kona background.

The pattern is a new design by Karen, who blogs at SugarFreeQuilts, available at her Etsy shop HERE. It comes with very detailed instructions, and a full-size 'map' to lay out your fabric pieces before piecing.
The double-layer backing used a technique new to me that was quite simple once I wrapped my brain around it.
I really ought to have switched to white thread for the binding though...

In other progress this week, I completed Step Two of the Christmas Table Topper QAL hosted by Carole of From My Carolina Home. Step Three was announced today, so hopefully I will get these pieced together over the weekend.
I am also looking forward to reading finishes shared at the Friday Linkups over the weekend!

Hope yours is a great one!
TGIFF is hosted this week at Anja Quilts!

Sunday, November 15, 2015

Le Challenge: Method. Using Orphan Blocks & Vintage Fabrics

Finding and using vintage fabrics is a bit of an art, and definitely a hobby of mine. When I began quilting, "The Quilting Police" were in their prime and I still hear their voices whispering in my head, "that fabric is sub-par,
it will not last 100 years,
it might bleed,
it might fade.... "
 There is some truth to this, and I look forward to sharing soon the biggest bleeding nightmare I have ever encountered. But not today as it is still a secret, and it's outcome is not yet known. However, the culprit in this case is a NEW, quilt-shop fabric.
Lately, I have been using some of my favorite vintage pieces and these things have been on my mind. You may have seen projects recently with some of these beauties:

Over the years there have been many times I've pulled lighter weight fabrics from my stash, yet there are many I just wont part with. Bottom line, I love them. I also love building my stash, as well as the thrill of the score! When I go fabric hunting at garage sales, estate sales and thrift shops, I seek them out. The rebel in me does not diminish and I continue to find vintage fabrics for my stash, and I find creative ways to use them.

Le Challenge for November is METHOD and I chose to finish up an orphan block that I found at a garage sale. There were six in the bundle, all signed and dated by different quilter's. They were made in the 80's for some sort of swap. Interestingly, most of them were appliqued on a poly/cotton blend background.
Unfortunately, purple is the hardest for me to photograph, especially on a stormy afternoon such as today. This is the best photo I came up with, taken indoors:
I Googled the maker and found that she passed away one year ago. Turns out Ruth was a Past President for her quilt guild. I did find a daughter and plan to mail this out to her once I finish hand-stitching the binding.
I used this method to make the Broken Dishes border:
This is the third orphan block that I have made into a mini, all with the same border.
One for myself:
I was able to find an address for the maker of this one:
She gave me a call after receiving the surprise in her mailbox and we spoke for more than an hour:)
Can you imagine opening this more than 30 years after you made a block and mailed it away for a swap? She was delighted:)

One thing I have learned about using vintage fabrics is that you really never know what you may end up using in the future. It is so nice to shop your own stash successfully when working on a project!

A few tips methods I use for stashing vintage:

1. Keep what you like if you have the space!
2. Avoid storing fabric in plastic bins if you can avoid it; they will acquire a peculiar odor.
3. If you can do this without offending anyone, smell the fabric before purchasing.
4. Wash pre-owned fabric before adding it to your own stash. Sometimes I air it outside for a few hours first. Then pre-soak in water with 1c. vinegar sprinkled with quite a bit of baking soda. Finally, wash with extra-gentle cycle and mild detergent. Dry and lightly press. Any odor remaining will be detected during the pressing, and I donate these to the thrift store.
5. I stick with 100% cotton for quilting. I can usually tell by the feel, however, if it generates static when removing from the dryer it is likely a poly blend. If you are really uncertain, a burn test can also be done. Take a lighter to a small snippet: Cotton will leave an ashy edge and synthetic leaves more of a melted edge, a bit like plastic.
6. I store lighter weight fabrics separate from premiums since I tend to use them together. I have been known to mix various weight fabrics with some quilts, but generally I use them together in scrappier quilts, smaller projects, linings, etc..

How bout these calico's, look familiar?


Thursday, November 12, 2015

Doubled My Zip Bag Pleasure


I decided my first little Zip Bag needed a mate!
A larger version following a variation of the Week One Bag, with 1 1/4" boxed corners .
I may not be able to complete a Week Two bag, the cute little Boxy Bags! Can't believe it is Friday already, but I am looking forward to next week and I have been eyeing my leather stash!

There are still several weeks of fun - check out the Bag It Series at Elm Street Quilts! 

Elm Street Quilts

Monday, November 9, 2015

Christmas Topper Quilt Along, Mystery or Not?

I am game to create a quick Christmas Quilty, with weekly assignments led by Carole of From My Carolina Home.
Carole is running a poll this week and will announce on Friday whether this is a mystery, or reveal the design to us along with Step Two of the Quilt Along.
Since I love the suspense, I went ahead and selected my four fabrics and made their cuts.
Done! Decisions made. Irreversible, regardless of the poll results!!

I have several more things to share today!

October was busy busy with visits from both our parents. Spring and Fall are the best times of year in Southern Nevada, and we look forward to company, and sitting outside for dinner.

Perhaps I risk exposing my ignorance, but I learned two new things from my DFIL last month:

1. The gas gage in most cars is located on the dash, on the same side of the steering wheel that the tank access is. (Am I the only one who has never noticed this? How handy when driving a rental, right?)

2. The song Vincent (Starry Starry Night), by Don McLean was written about Van Gogh! Here is a 4min clip with lyrics set to his artwork..


Best October ever!
My sister stayed for five nights! Here we are at Hoover Dam taking selfies...
It went by so fast, but it did give me the time I needed to hook her into quilting!
That's right, JULIE IS A QUILTER!
I didn't give her time to make decisions - I just gave her squares leftover from a mini I made early this year (see Traditional Sunrise). She learned to make HST's, piece and square them; she arranged them in every way imaginable (that's when I knew she was hooked, haha!), and finally decided on this layout.
She is free-motion quilting!
The binding was attached mere minutes before we left for her flight, and she took it home to complete by hand:)


Sunday, November 8, 2015

Kitchen Towel Hanger Tutorial

My mom and I enjoy exchanging dish towels at Christmastime. This year I am planning to do a little embroidery work on regular flour sack type towels for her & I thought I may be able to dress them up a bit by creating a hanger for them.

I actually made these in October when I saw the new Linkup Party for sharing tips and tutorials, a monthly linkup hosted by Sew and Sow Farms, however, I ran into a few flaws as I created them and therefore missed the Inaugural Linkup.
They were set aside until the last minute of course, and this morning I spent some time coming up with a technique that will hang well:

Materials:

* 2 pieces fabric cut 5.5" square
* 1" x 6" fabric to make piping
* 2" x 10" fabric to make ruffle (prepare ruffle by folding in half lengthwise, press ends in 1/4", gather to approximately 4.5", and baste.
* 6" x 1/2" wide elastic
* 5.5" square batting
* 6" piece ricrac or ribbon for hanger
* 4>5" square white tagboard (I used the cardboard from a cheap fat quarter)
Start by gathering materials, and completing any custom work you would like to add. Embroidery would be nice! I added the applique berry and ricrac to one, then made piping and ruffles for the other two.
After basting the piping, then the ruffle, I folded and pinned the corners of the ruffles in before sandwiching.
Layer the front and back pieces, right sides together, setting the elastic between, horizontally, about 1 1/2 to 2" from the top. Set the batting on top of those and pin or clip the sandwich together.
 Sew 1/4" in, around the sides and bottom, leaving the top edge open. Clip corners, and I like to finger press the top edge at this point, before turning right side out.
 Turn right side out, with the elastic landing on the backside, and tidy the corners.

Slip the cardboard in the top opening
 Pin or clip the top edge, inserting the hanger in the middle.
Stitch across the top, very close to the edge.
Top stitch all edges if desired!
I only did this on one of mine..
Backside..
This last photo shows how flimsy these were the first run through, before I added the cardboard. My fix really worked, in that it has kept them from bowing when the towel is hung, however this means they can only be spot-washed. Using heavy interfacing may be a good option!
Wish I had had time to finish some embroidery work!

Linking up with Sew Simple Saturday!
Next month I plan to do a Christmas project:)

Thursday, November 5, 2015

BBD Kaleidoscope, Throwback Thursday

With thanks to Throwback Thursday, we get to share with the world our Before-Blogging-Day Quilts!

Today's quilt was made in 2003BBD!
I figure if you are a fan of BBD quilts, you probably admire BBD photographs as well.
Bear with me Dear Readers, these snapshots are shaky, shady, and, well, shi--y...
Today I thought I would share the quilt behind my avatar, a green kaleidoscope I finished and gifted to a dear friend before I moved away from Eastern Washington. Parting with Cindy made me sorrowful and this quilt helped me express my love for her. She chose the green and rustic colors for her Priest Lake cabin, in Idaho.
I cut strips of fabric and used a template to cut the patchwork. I think they are 8" blocks, but perhaps 10". I was current enough then to have a digital camera, & photos helped with layout decisions.

I'd just begun experimenting with free-motion quilting at this time, and only on small baby quilts. Most of my quilts prior to this were quilted straight-line, with a walking foot. I remember being quite nervous, but I just went for it, quilting large spirals.
Neither Kitty or I had gray hairs then...
Mister Cat passed away a couple years ago and we sure miss him.
I wish I had a better pic of the label! I was still hand stitching letters on muslin as my standard label. It reads, "Made by Heidi, with Love and Gratitude for Cindy"

Do you have any BBD quilts?
Visit Jenn @ Quarter Inch from the Edge to linkup!

A Quarter Inch from the Edge

Wednesday, November 4, 2015

ALYoF Interrupted by Bagging It!!!

I made the cutest little zip-pouch this morning!
Really, I try to stay focused, I do, but I am continually distracted. I blame it on savvy quilter's like Patty, from Elm Street Quilts, and Carol, who blogs at From My Carolina Home, these among the many blogger's that offer sweet temptations I cannot resist...
I have not even set my goals for the month and already I am breaking them!
Seriously, where is my resolve?
It seems I have jumped right on board with the Bag It!!!
Have you seen the series at Elm Street Quilts?
Irresistible FUN! I finished the first bag, and there are more tutorials to come..

Elm Street Quilts
Thought I better share the temptation with all the friendly folk who party with Lorna at Lets Bee Social, and another tidbit I will pass on too...


Carole gave me word she will be announcing a short holiday mystery-along on Friday. (Am I hopeless?)

Are all my flimsies doomed once they are draped on a hanger?

I had a lot of trouble selecting my monthly goal for November, but the clock is ticking and it is time to put something in writing! We all know the first step to achieving a goal is to actually set one. I have two projects I am currently working on that I can not post pictures of since they are gifts, and new bags and QAL's are not in line with my Q4 FAL goals!

My goal for November's Lovely Year of Finishes is to piece a backing and sandwich my Cozy Christmas Quilt. It may seem like an easy goal, however there are several projects ahead of it so this goal will actually help push them all along. Good Luck!